


| Quantity | Fixed price |
|---|---|
| 1 | $132.00 |
| 2 | $132.00 |
| 3+ | $132.00 |

Cost From
$2.25 per m2

Re-Coat
4 - 6 hrs

UV Stable
Yes

Coverage
5-8m2 per ltr

Coats
2-3

Equipment
Roller

Dilution
No

Clean Up
Solvent
Features
- Ultimate high performance, UV stable polyurethane coating
- Suitable for Concrete and Timber
- Non-yellowing with excellent gloss retention
- Outstanding resistance to weathering
- Forms an extremely hard wearing, scratch resistant surface
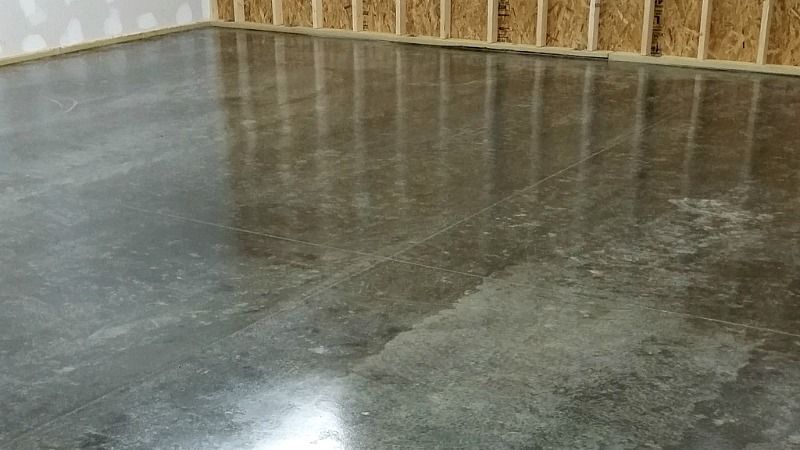
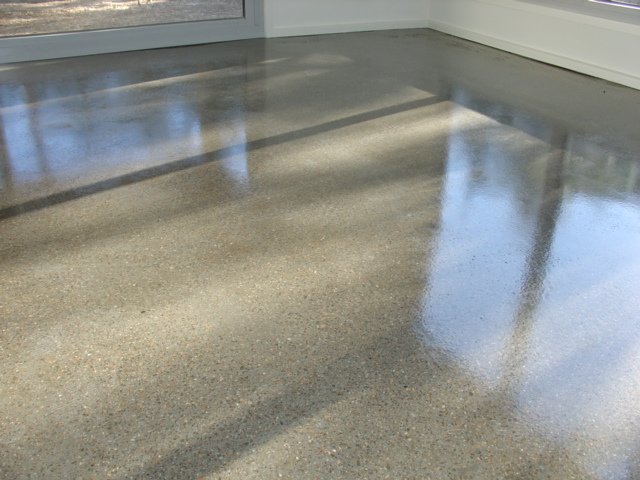
- Darkens the concrete substrate and gives a wet look
- Coloured coating systems available in 20L packs
- Available in a clear finish or a wide range of colours
- Clear coating system available in either 4L or 20L
- Dramatically improves ease of cleaning and maintenance of concrete substrates
- Top coat in the Flake Epoxy Kit or as a clear coat over diamond ground concrete for a polished look.
- Product Description
- Colour Chart
- Ideal For
- Coverage Rates
- Information Guides
- Specifications
- Reviews (12)
Product Description
Polyurethane Coating is the ultimate in high performance, UV stable polyurethane coatings! It is a high solids, high gloss, two-pack (4:1), non-yellowing polyurethane that is available in a clear finish or a variety of colours. Polyurethane dramatically improves the clean-ability and maintenance of concrete or timber substrates and forms an extremely hard wearing, scratch resistant surface.
The Right Choice Polyurethane Floor Coating will darken the concrete substrate and give a “wet look”. It is also used as a top coat over the Right Choice Epoxy Flake Flooring system and as a clear coat over diamond ground concrete for a polished concrete look. Clean-up is with the Right Choice Solvent.
NOTE – The full colour range is based on standard Colourbond Colours. Unfortunately if a desired colour is not shown then it is not available.
Please ensure to check the colour of the sealer prior to installation. Once the product has been applied, Right Choice can take no responsibility for any discrepancies in colour variations.
Colour Chart


Disclaimer
The colour swatches shown have been colour matched to the COLORBOND® steel colours. The colour swatches have been reproduced to represent actual product colours as accurately as possible. However, we recommend checking your chosen colour against an actual sample of the product before purchasing as desktop screens and smart phone devices may affect colour tones. COLORBOND® and ® colour names are registered trademarks of BlueScope Steel Limited. TM colour names are trademarks of BlueScope Steel Limited. ABN 16 000 011 058. All rights reserved.
Ideal For
- Interior
- Warehouse
- Garage
- Bathroom
- High Traffic Areas
Coverage Rates
20 litres will do 2 coats over approximately 60m² – 70m² (concrete porosity dependent)
Coverage rates will be determined by how porous the concrete is (how easily water soaks in). The easier and quicker that water soaks in, the more porous the concrete is and the more product you will use.
Surface Porosity
- Ensure the concrete has sufficient porosity for the sealer to penetrate.
- Dip a finger into a glass of water and apply 2-3 drops to the surface.
- Time the amount of time it takes for the water to soak into the concrete.
- For sufficient porosity to apply a sealer, this should be no longer than 90 seconds.
- Repeat the test over multiple sections of the concrete substrate.
- If under 90 seconds then the concrete has sufficient porosity for application of the sealer.
- If longer than 90 seconds, then it may be necessary to either acid wash or diamond grind the concrete to open it up and create the required porosity.
Quantity Estimator
Enter the dimensions of your surface area to estimate how many tins of product you may need:
Information Guides
- Download: Technical Data Sheet
- Download: Preparation Guide
- Download: Application Guide
- Download: Troubleshooting Guide
General Notes
- Ensure to read the TECHNICAL DATA SHEET, the PREPARATION GUIDE and the APPLICATION INSTRUCTIONS thoroughly first.
- It is recommended to do a test patch first to determine the suitability of the product.
- When applying the final coat, always ensure to use product from the same batch number and apply in the same weather conditions or you may get a colour or sheen variation. Be mindful of air conditioners or drafts blowing across the substrate during the curing process as this also can cause a variation in sheen levels.
- Do not apply when the ambient temperature is below 15c or above 28c.
- The substrate must be cool to touch before applying any sealer or coating.
- Always follow the manufacturer’s guidelines for coverage.
- Generally only two coats are required, however on a highly porous surface then a third coat may be necessary.
PREPARATION:
Surface Porosity
- Ensure the concrete has sufficient porosity for the sealer to penetrate.
- Dip a finger into a glass of water and apply 2-3 drops to the surface.
- Time the amount of time it takes for the water to soak into the concrete.
- For sufficient porosity to apply a sealer, this should be no longer than 90 seconds.
- Repeat the test over multiple sections of the concrete substrate.
- If under 90 seconds then the concrete has sufficient porosity for application of the sealer.
- If longer than 90 seconds, then it may be necessary to either acid wash or diamond grind the concrete to open it up and create the required porosity.
Moisture
- The substrate must be dry and free from any rising moisture.
- Ideally use a concrete moisture meter to determine the moisture content. If this is not available, proceed using the method below.
- To test for moisture, cut a piece of thick black plastic into 1m².
- Ensure that it is free from any tears or pinholes (this would render the test useless).
- Attach the plastic to a section of the substrate (repeat in other areas) & duct tape the edges.
- It is important that the plastic is completely sealed around all edges and free from holes.
- After 24 hours, remove the plastic. If the concrete has darkened or there is condensation under the plastic, then the concrete is not sufficiently dry to apply a sealer or coating.
- If the substrate is not dry enough then either wait a few more days & repeat the test or it may be necessary to use a concrete moisture barrier. Contact Right Choice for advice.
Contamination
- All substrates must be clean and free of contamination i.e. oil, grease, bird droppings etc.
- Many of these contaminates are easily removed using the Right Choice Concrete Cleaner.
- In some cases it may be necessary to use a concrete grinder or a light acid wash.
- Basically, if water does not penetrate through the contamination then neither will a sealer or a coating.
Acid Etching
- If required, the concrete can be lightly acid etched prior to sealing. This will help to create a more porous substrate.
- Use extreme caution and safe handling methods when using hydrochloric acid.
- Before acid etching, make sure the concrete is cleaned properly of all contaminants, oil, grease and dirt by using the Right Choice Concrete Cleaner (mix @ 50:50 dilution with water), paying extra attention to heavily contaminated areas.
- Rinse the Concrete Cleaner off thoroughly with clean water.
- Dilute the hydrochloric acid with water at a rate of 1 part acid to 10 parts water. CAUTION! Always add the acid to the water, not water to acid.
- Lightly dampen the surface so that the concrete is slightly wet but not puddling water.
- Apply the diluted solution evenly to the surface using a watering can or similar.
- Allow the acid to bubble on the concrete for up to 15 mins.
- Once the bubbling has ceased, thoroughly rinse the surface off with clean water (abide by local laws for disposal).
- Neutralise the surface using the Right Choice Concrete Cleaner (mix @ 50:50 dilution with water, highly alkaline). Brush the mixture into the surface and allow it to sit for 5-10mins before rinsing thoroughly with clean water.
- Allow the surface to dry for a minimum of 24 hours (weather dependant).
*Note – If neutralising is not done correctly, acid etching can leave a white powdery residue, (calcium carbonate) on the dried surface. This is a fine white dust which can cause problems with adhesion and delamination of the coating. Once neutralising is complete, check the entire surface of the concrete. It should have a uniformed texture similar to medium grit sand paper (If not, repeat the above process). Sprinkle a few drops of water over the surface and If all the water is quickly absorbed, the surface is sufficiently oil and grease free. If the water still beads up (even if only in certain areas), then further preparation as above will be required.
APPLICATION:
IMPORTANT NOTE:
Before applying any product, please open all coloured drums to check that the colour is correct. If there is any variance in colour etc, please contact Right Choice Coatings before proceeding. Once the product has been installed, Right Choice Coatings will not be held responsible for any colour variations.
Mixing: Part 1
- Note: Do NOT mix just 1 batch of coloured polyurethane at a time and then apply as you will get a colour variance, it must be done as stated below.
- The best option for mixing is to use a slow speed drill with a mixing paddle.
- If using multiple batches (regardless of if it is pre-tinted or a tint pack added), you need to follow the instructions below or a colour variation may occur.
- Note: DO NOT add part B just yet, it will be added later after the colour is mixed.
- Make a line on the outside of each 20ltr drum where it is filled to (after batching you will fill each drum back up to this line)
- Add 1 tint colour pack to each 20ltr drum (if not pre-coloured) and mix thoroughly. Pour 1/4 of each drum into a clean bucket and mix them all together. Pour back into the original drums & repeat the process back & forth until all drums are a uniform colour.
- Fill each drum up to the previously marked line and mix thoroughly again. This is now 20ltrs of tinted part A product ready for adding part B and application.
Mixing: Part 2
- Polyurethane Coating should be mixed at a ratio of 4 parts of A to 1 part of B
- Only mix enough product that can be used within a 10-15 minute period (approx. 5ltrs).
- Mix “part A” thoroughly first, then, slowly pour “part B” into “part A” while still mixing. Mix slowly & thoroughly for 2 minutes ensuring not to create bubbles in the product.
- Immediately pour the Polyurethane onto the substrate in ribbons. (Do not leave the Polyurethane in the bucket as it will go off much quicker.)
- Use a new bucket for every new batch that you mix. Never mix a new batch in a previously used bucket as this will accelerate the setting time of the Polyurethane and you decrease the working time dramatically.
Application
- Always wear the appropriate personal protection equipment.
- The Polyurethane Coating should be applied using a lint free, 8mm – 10mm nap, solvent resistant roller cover.
- Spread the Polyurethane Coating out roughly to achieve approx. 5m² – 7m² per ltr. Once the spread rate is achieved, gently “tip off” the polyurethane with the roller and move on to the next section. This will allow the polyurethane to self level. The more times you roll it, the more chance there is of it going off too quick and getting roller marks
- Ensure to keep “wet edge” of the sealer to avoid any overlapping marks.
- Allow 6-8 hours drying time in-between coats.
- Apply the second coat in the same manner as above.
- If you allow more than 10 hours drying time in-between coats, it will be necessary to wait approx. 12 hours and then sand the floor using a 180# sandpaper prior to applying another coat.
- Do not walk on for a minimum of 24 hours and allow 10 days before driving over.
*NOTE: Polyurethane has a 7-10 day full cure through rate. Please exercise caution when sitting furniture on, sliding boxes etc and walking on in this time frame. DO NOT DRIVE ON FOR A MINIMUM OF 10 DAYS.
Specifications
Product Name: Polyurethane Coating
Material: Acrylic urethane coating
Pack Sizes:
4L System: Part A – 3.2L; Part B – 800ml (mix 4:1 by volume)
20L System: Part A – 16L; Part B – 4L (mix 4:1 by volume)***
12 reviews for Polyurethane Coating
-
Polyurethane sealer
Awesome product and the staff are so incredibly helpful and get back to all your questions promptly. I am not a super “handy person” they told me all steps to do and floor has come out amazing. Can not recommend this company enough. Thanks so much
-
Excellent product
Agent are very helpful on helping me to select the right product.
Thanks,
-
Polyurethane Coating on Epoxy
Some areas of the Polyurethane were a bit too thick and when it dried it cracked and lifted the grey epoxy underneath. The troubleshooting team immediately gave me feedback on the problem and how to repair. Ground the areas back to concrete, re-epoxied and re-polyurethanes those areas. Make sure you don’t put the polyurethane on too thick!
Unfortunately, they only sell 10 litre drums of epoxy whereas I only needed about 500ml for the repair. Would be good to stock smaller quantities for this purpose i.e. 1 litre or 4 litres.
Anyway the job turned out well – good product. -
Great finisher
Didn’t realize we needed this for our garage floor but glad it was recommended by right choice. Really finished the job properly. As with everything else, service, quality of communication and the products etc was brilliant.
-
Great product, easy to apply
I used this to create a clear coat on top of my DyMark floor.
It turned out great and wish I had used Right Coating from the beginning rather than go to Bunnings and use DyMark.
-
Excellent service and product. I have used the same product at Bunnings several times and I don’t know people still buy it. Cheaper and gets sent straight to your door. If you have a question or issue, I sent an email off and got a mobile number to call. And the service was 100%. Will definitely be purchasing all my floor paint/epoxy or Polyurethane from Right Choice.
-
Polyurethane was used over the top of a levelling coat, then a quick rough grind for pattern, old garage turned in to a bedroom. First time used went great.
-
Polyurethane 4L kit. 9m2 garden shed – 2 coats. Happy with the product and result.
-
Good product I made the mistake and mixed 2 parts paint to one part hardener and struggled with the last of mixture as it was going off but now that I know the correct ratio of the mix I might have more time to work with next time
-
Had a query last night. First thing in the morning received a phone call. Tony was more than happy to discuss and recommend appropriate product for my garage floor which I had already laid down epoxy with flake. I only wished that I had bought the epoxy coating from you guys rather than from a well known auto shop. Thank you for recommending the right product even though it was cheaper. Will be recommending your business to my friends and family.
-
I had a few issues with porous concrete, however I got some great advice from Right Choice and the floor came out perfect. Thanks so much for your help.
-
Worked great on my concrete bench top
Pete Dunbrew –
Worked great on my concrete bench top
Zak Gravas –
I had a few issues with porous concrete, however I got some great advice from Right Choice and the floor came out perfect. Thanks so much for your help.
MARLOWE ANGELES (verified owner) –
Had a query last night. First thing in the morning received a phone call. Tony was more than happy to discuss and recommend appropriate product for my garage floor which I had already laid down epoxy with flake. I only wished that I had bought the epoxy coating from you guys rather than from a well known auto shop. Thank you for recommending the right product even though it was cheaper. Will be recommending your business to my friends and family.
Robert –
Good product I made the mistake and mixed 2 parts paint to one part hardener and struggled with the last of mixture as it was going off but now that I know the correct ratio of the mix I might have more time to work with next time
Darryl Wanders –
Polyurethane 4L kit. 9m2 garden shed – 2 coats. Happy with the product and result.
Gary Livingstone –
Polyurethane was used over the top of a levelling coat, then a quick rough grind for pattern, old garage turned in to a bedroom. First time used went great.
Christopher (verified owner) –
Excellent service and product. I have used the same product at Bunnings several times and I don’t know people still buy it. Cheaper and gets sent straight to your door. If you have a question or issue, I sent an email off and got a mobile number to call. And the service was 100%. Will definitely be purchasing all my floor paint/epoxy or Polyurethane from Right Choice.
Michael Edgley (verified owner) –
I used this to create a clear coat on top of my DyMark floor.
It turned out great and wish I had used Right Coating from the beginning rather than go to Bunnings and use DyMark.
Nuj –
Didn’t realize we needed this for our garage floor but glad it was recommended by right choice. Really finished the job properly. As with everything else, service, quality of communication and the products etc was brilliant.
Peter Gore (verified owner) –
Some areas of the Polyurethane were a bit too thick and when it dried it cracked and lifted the grey epoxy underneath. The troubleshooting team immediately gave me feedback on the problem and how to repair. Ground the areas back to concrete, re-epoxied and re-polyurethanes those areas. Make sure you don’t put the polyurethane on too thick!
Unfortunately, they only sell 10 litre drums of epoxy whereas I only needed about 500ml for the repair. Would be good to stock smaller quantities for this purpose i.e. 1 litre or 4 litres.
Anyway the job turned out well – good product.
Ronny (verified owner) –
Agent are very helpful on helping me to select the right product.
Thanks,
Erin (verified owner) –
Awesome product and the staff are so incredibly helpful and get back to all your questions promptly. I am not a super “handy person” they told me all steps to do and floor has come out amazing. Can not recommend this company enough. Thanks so much