


Cost From
$22.50 per m2

Re-Coat
12 - 18 hrs

UV Stable
Yes

Coverage
10m2 per kit

Coats
3

Equipment
Roller

Dilution
No

Clean Up
Solvent
Features
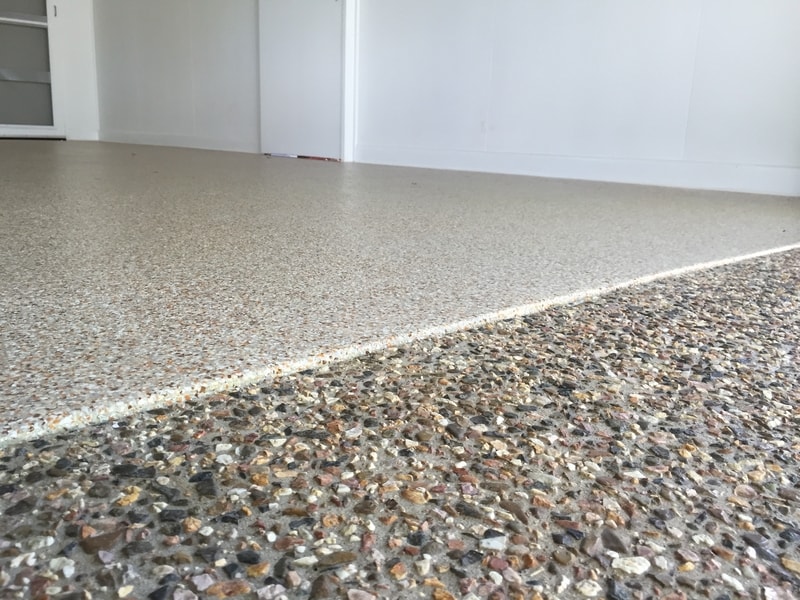
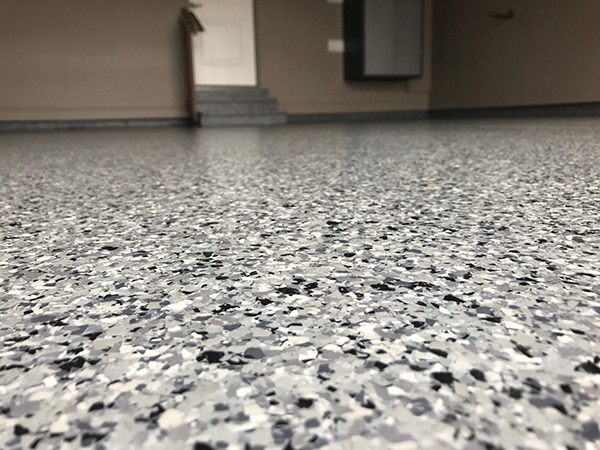
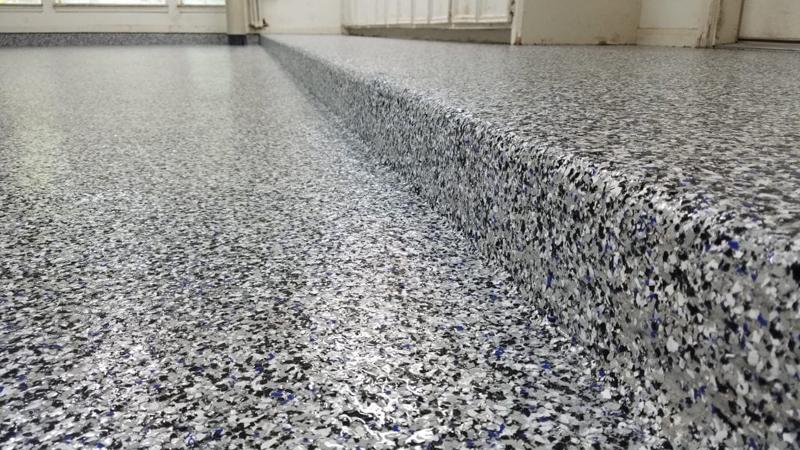
- Commercial grade, high quality, seamless epoxy floor coating system
- Produces permanently bonded, resilient, seam-free, durable and attractive floor
- Can be used in wide range of areas such as; garages & warehouses
- Highly stain resistant & easily cleaned by sweeping and using mild detergents
- Contains enough product to complete 10m2
- Available in a wide range of colours
- Product Description
- Colour Chart
- Ideal For
- Coverage Rates
- Information Guides
- Specifications
- FAQ's
- Reviews (20)
Product Description
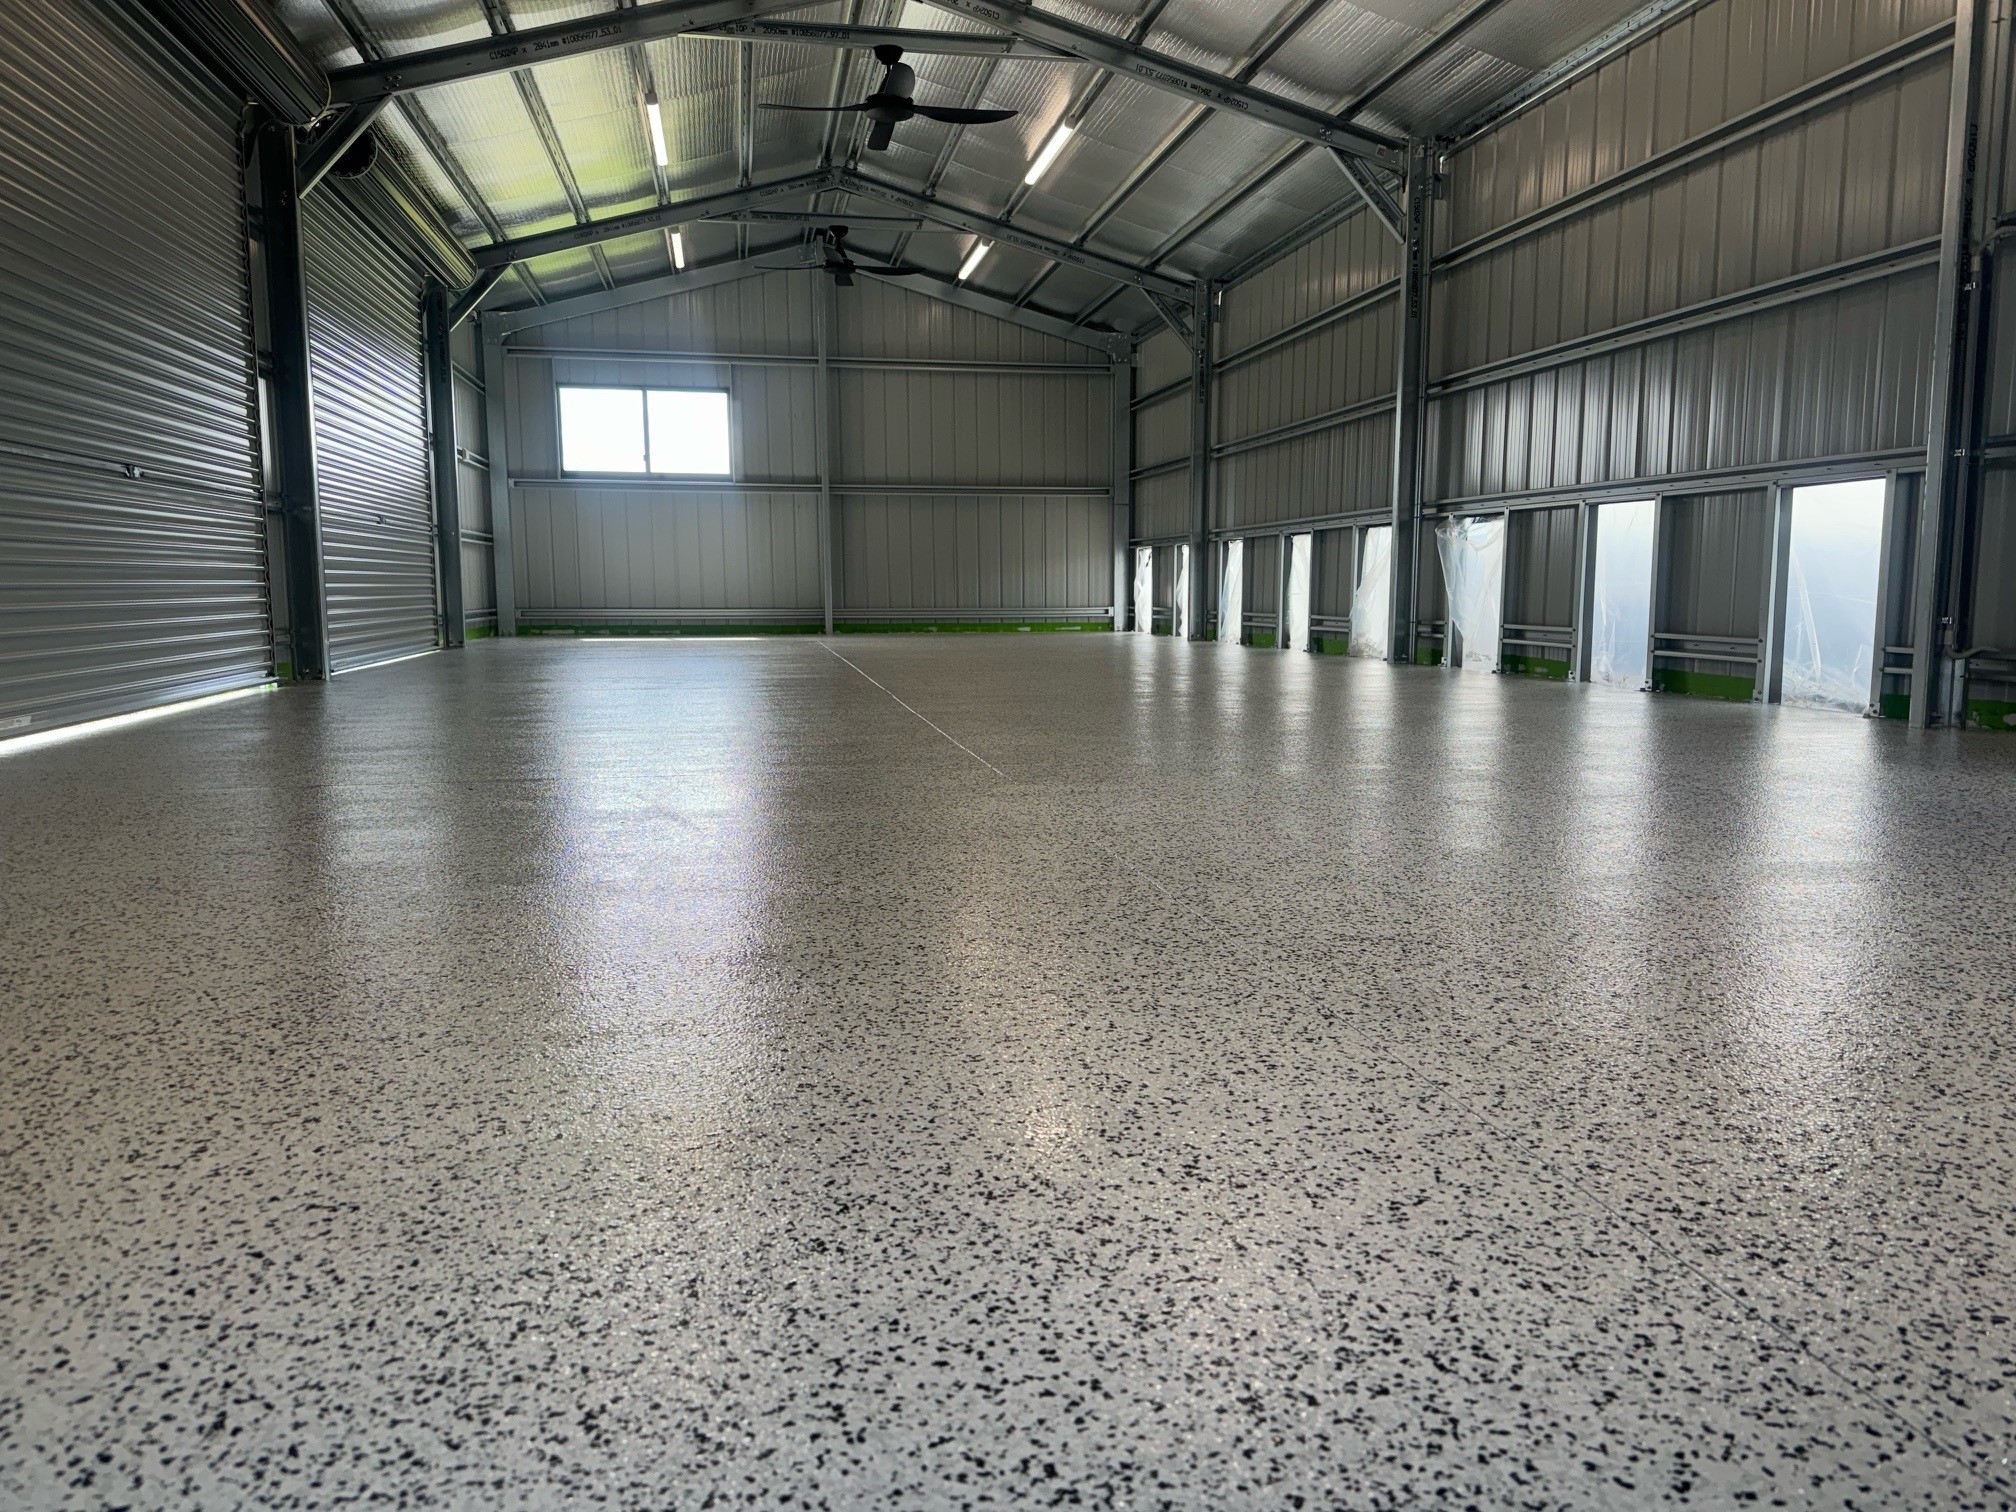
The Right Choice Epoxy Flake Flooring Kit is a commercial grade, decorative epoxy flooring system containing enough product to complete 10m2.
It consists of:
All of the kits components have been specifically selected to complement each other to produce a high quality, seamless epoxy flooring system. The Right Choice Decorative Flake Flooring Kit forms a permanently bonded, resilient, seam-free, durable and attractive epoxy floor coating.
The Right Choice Flake Flooring Systems can be used in wide range of areas such as; garages, warehouses, washrooms, toilets and high traffic areas to name a few…
There is a large range of colours available to meet your requirements, please see below. Seamless epoxy flooring can be easily cleaned with mild detergents and are highly stain resistant floors.
Notes:
- If the concrete substrate is highly porous (water soaks in easily), then it is advised to 1st prime the concrete with Aqua Prime (not included).
- A Slip reducing additive may be applied in the Polyurethane top coat to help prevent unnecessary slips and falls (not included).
- Clean-up for the Polyurethane top coat is with the Right Choice Solvent (not included).
- It is also recommended to use Spike Shoes for walking in the wet epoxy to broadcast the flake chips without damaging the floor (not included).
***For Demonstration Purposes Only***
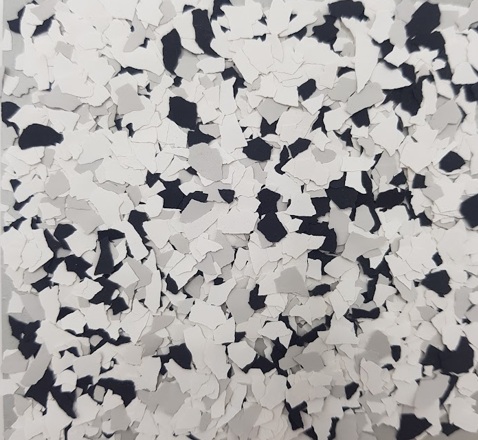
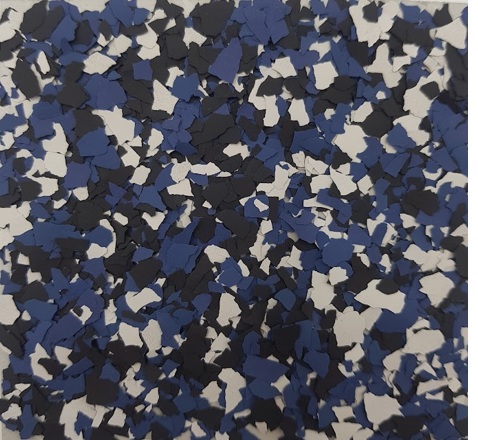
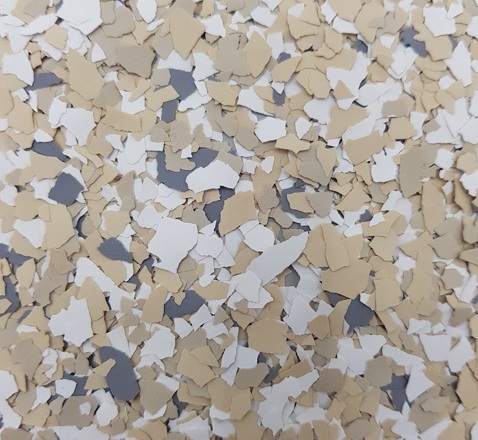
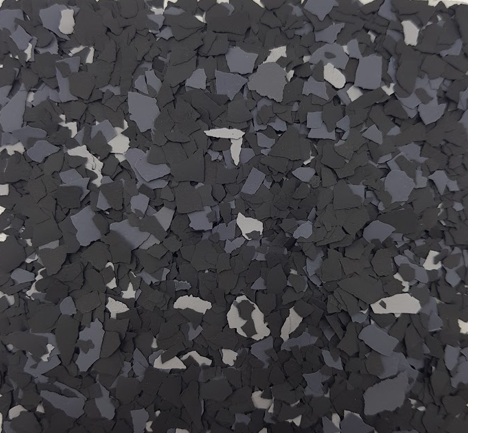
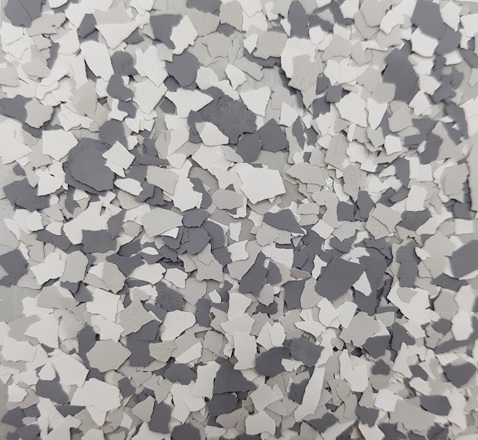
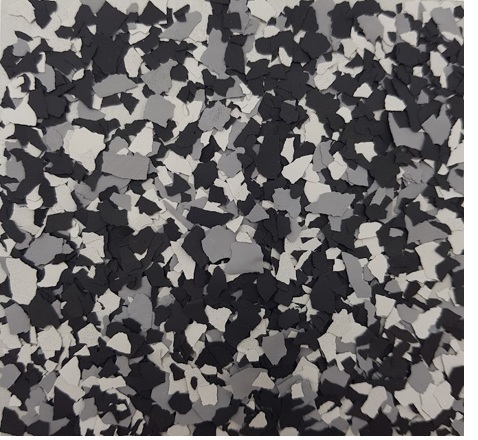
Colour Chart
Ideal For
- Residential Garages
- Interior Floors
- Warehouse Floors
- Commercial Bathroom’s
- High Traffic Areas
- Retail Stores
- Fast Food Outlets etc..
Coverage Rates
The kit contains enough product to complete 10m2
Information Guides
-
-
- Download: Preparation Guide
- Download: Application Guide
-
Product Technical Data Sheets:
-
-
- Download: Aqua Prime
- Download: Water Based Epoxy
- Download: Epoxy Flake Chips
- Download: Polyurethane Coating
-
General Notes
-
-
- Ensure to read the all of the TECHNICAL DATA SHEETS, the PREPARATION GUIDE’S and the APPLICATION INSTRUCTIONS thoroughly first.
- It is recommended to do a test patch first to determine the suitability of the product.
- Do not apply when the ambient temperature is below 15c or above 28c.
- Do not apply in direct sunlight when the temperatures exceed 28c.
- The substrate must be cool to touch before applying any sealer or coating.
- Always follow the manufacturer’s guidelines for coverage.
-
PREPARATION:
Surface Porosity
-
-
- Ensure the concrete has sufficient porosity for the sealer to penetrate.
- Dip a finger into a glass of water and apply 2-3 drops to the surface.
- Time the amount of time it takes for the water to soak into the concrete.
- For sufficient porosity to apply a sealer, this should be no longer than 90 seconds.
- Repeat the test over multiple sections of the concrete substrate.
- If under 90 seconds then the concrete has sufficient porosity for application of the sealer.
- If the water soaks in extremely fast (30 seconds or less), then it is advisable to apply Aqua Prime before an application of the base coat of epoxy.
- If longer than 90 seconds, then it may be necessary to either acid wash or diamond grind the concrete to open it up and create the required porosity.
-
Moisture
-
-
- The substrate must be dry and free from any rising moisture.
- Ideally use a concrete moisture meter to determine the moisture content. If this is not available, proceed using the method below.
- To test for moisture, cut a piece of thick black plastic into 1m².
- Ensure that it is free from any tears or pinholes (this would render the test useless).
- Attach the plastic to a section of the substrate (repeat in other areas) & duct tape the edges.
- It is important that the plastic is completely sealed around all edges and free from holes.
- After 24 hours, remove the plastic. If the concrete has darkened or there is condensation under the plastic, then the concrete is not sufficiently dry to apply a sealer or coating.
- If the substrate is not dry enough then either wait a few more days & repeat the test or it may be necessary to use the Right Choice Concrete Moisture Barrier.
-
Contamination
-
-
- All substrates must be clean and free of contamination i.e. oil, grease, bird droppings etc.
- Many of these contaminates are easily removed using the Right Choice Concrete Cleaner.
- In some cases it may be necessary to use a concrete grinder or a light acid wash.
- Basically, if water does not penetrate through the contamination then neither will a sealer or a coating.
-
Acid Etching
-
-
- If required, the concrete can be lightly acid etched prior to sealing. This will help to create a more porous substrate.
- Use extreme caution and safe handling methods when using hydrochloric acid.
- Before acid etching, make sure the concrete is cleaned properly of all contaminants, oil, grease and dirt by using the Right Choice Concrete Cleaner (mix @ 50:50 dilution with water), paying extra attention to heavily contaminated areas.
- Rinse the Concrete Cleaner off thoroughly with clean water.
- Dilute the hydrochloric acid with water at a rate of 1 part acid to 10 parts water. CAUTION! Always add the acid to the water, not water to acid.
- Lightly dampen the surface so that the concrete is slightly wet but not puddling water.
- Apply the diluted solution evenly to the surface using a watering can or similar.
- Allow the acid to bubble on the concrete for up to 15 mins.
- Once the bubbling has ceased, thoroughly rinse the surface off with clean water (abide by local laws for disposal).
- Neutralise the surface using the Right Choice Concrete Cleaner (mix @ 50:50 dilution with water, highly alkaline). Brush the mixture into the surface and allow it to sit for 5-10mins before rinsing thoroughly with clean water.
- Allow the surface to dry for a minimum of 24 hours (weather dependant).
-
*Note – If neutralising is not done correctly, acid etching can leave a white powdery residue, (calcium carbonate) on the dried surface. This is a fine white dust which can cause problems with adhesion and delamination of the coating. Once neutralising is complete, check the entire surface of the concrete. It should have a uniformed texture similar to medium grit sand paper (If not, repeat the above process). Sprinkle a few drops of water over the surface and If all the water is quickly absorbed, the surface is sufficiently oil and grease free. If the water still beads up (even if only in certain areas), then further preparation as above will be required.
APPLICATION:
IMPORTANT NOTE:
Before applying any product, please open all coloured drums and boxes of flake to check that the colour is correct. If there is any variance in colour etc, please contact Right Choice Coatings before proceeding. Once the product has been installed, Right Choice Coatings will not be held responsible for any colour variations.
Step 1 – Aqua Prime (if used)
-
-
- Aqua Prime only requires 1 coat and can be applied by brush, roller, broom, or pump up sprayer, however the best results are achieved using a roller.
- Aqua Prime can be poured directly onto the surface or into a roller tray. Ensure the entire surface it wet, avoid applying the primer/sealer too thick or having it pool on the surface.
- Allow the primer to completely touch dry before applying a subsequent sealer or coating. A minimum of 3 hours drying time is required, weather dependent.
- Ensure that the subsequent sealer or coating is applied within 12 hours of the initial application of the Aqua Prime. The surface must be completely dry before applying any topcoat. Please consult the relevant TDS for topcoat application details.
-
Step 2 – Water Based Epoxy Base Coat
If using multiple batches:
-
-
- Make a line on the outside of the tin where it is filled to (after batching you will fill each tin back up to this line)
- After adding the colour pack (unless already pre-tinted) to each batch, pour 1/4 of each batch into a clean bucket and mix them all together. Repeat this process back and forth until all batches are a uniform colour.
- Note: Do NOT mix just 1 batch at a time and then apply as you will get a colour variance.
- Fill each tin back up to the line previously marked and mix thoroughly again. This is now a tinted product ready for application.
-
Mixing
-
-
- Mix “part A” thoroughly first.
- Once mixed, slowly pour “part B” into “part A” while still mixing. Mix for approximately 2 minutes using a slow speed drill and squirrel mixing paddle. Allow to stand for 1 minute & then mix again for 1 minute.
- If thinning is required, it is possible to add no more than 5% water to help with the flow. Only add the water to the already MIXED epoxy and slowly mix in thoroughly.
- Only mix enough epoxy that can be used within 20 minutes. It’s a good idea to start with mixing only 4ltrs (3ltrs of A to 1ltr of B) to begin with until you are confident with the amount of product that can be installed in a 20min window.
- Never mix a new batch in a previously used bucket as this will accelerate the setting time of the epoxy and you decrease the working time dramatically.
-
Application
-
-
- Always wear the appropriate personal protection equipment.
- Mask up the surrounding skirtings etc.
- Water Based Epoxy should be applied using a 10mm, lint free roller cover.
- Immediately pour the mixed epoxy onto the substrate in ribbons. (Do not leave the epoxy in the bucket or a roller tray as it will go off much quicker)
- Cut in the edges using a brush and roll apply the Epoxy evenly at the approximate rate of 5m² per ltr without leaving any puddles.
- The more times you roll it, the more chance there is of it going off too quick and getting roller marks.
- Ensure to keep “wet edge” of the epoxy to avoid any overlapping marks or roller marks.
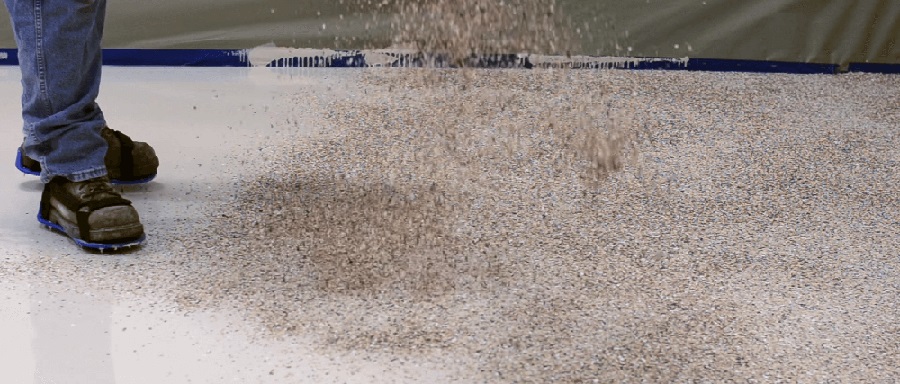
- Before the Water Based Epoxy begins to dry, walk back over the epoxy in spike shoes, broadcasting the Decorative Flake chips evenly & liberally into the wet epoxy ensuring that no bare patches are left. If you see gloss patches, apply more flake until the entire floor looks like dry flake.
- Allow the epoxy and flake to harden for 16‐20 hours.
- Sweep up any excess Decorative Flake and give the floor a very light hand sand or scrape to flatten any flake that is standing up. Sweep and vacuum thoroughly.
- *Note: The excess flake that is scraped/swept up is good for minor repairs etc, however do not use it to do a complete floor especially if it is next to the original floor as the flake will be broken up a lot smaller and will look completely different to new, larger size flake.
- Remove any tape from the skirting edge carefully.
-
Step 3 – Polyurethane Top Coats
Mixing
-
-
- Polyurethane Coating should be mixed at a ratio of: 4 parts A to 1 part B
- Mix “part A” thoroughly first. Once mixed, slowly pour “part B” into “part A” while still mixing.
- Use a new bucket for every new batch that you mix. Never mix a new batch in a previously used bucket as this will accelerate the setting time of the Polyurethane and you decrease the working time dramatically.
-
Application
-
-
- Always wear the appropriate personal protection equipment.
- Polyurethane Coating should be applied using a lint free, 8mm – 10mm nap roller cover.
- Ensure the floor is completely free from any loose flake and proceed with the first coat of Polyurethane.
- Immediately pour the mixed Polyurethane onto the substrate in ribbons. (Do not leave the Polyurethane in the bucket or roller tray as it will go off much quicker)
- Cut in the edges using a brush and roll apply the Polyurethane evenly at the approximate rate of 6m² per ltr without leaving any puddles. Once the spread rate is achieved, gently “tip off” the polyurethane with the roller and move on to the next section. This will allow the polyurethane to self-level. (The more times you roll it, the more chance there is of it going off too quick and getting roller marks).
- *NOTE – It is very important that when you are brushing or cutting in the edges, you must ensure not to apply the Polyurethane too thick. Once the edges are done, ensure to roll over the brush marks as close to the edge as possible to thin the Polyurethane out to be the same thickness that is on the rest of the floor. If it is applied too thick, the Polyurethane will crack and lift the epoxy and flake underneath.
- Ensure to keep “wet edge” of the Polyurethane to avoid any overlapping marks.
- Allow 5-8 hours drying time in-between coats.
- When the first coat of polyurethane is completely dry proceed with a subsequent coat, rolling at 45 deg. angles to the previous to achieve an approximate spread rate of 7-8m2 per ltr.
- If you allow more than 8 hours drying time in-between coats, it will be necessary to wait approximately 12-16 hours and then sand the floor using a 180# sandpaper prior to applying another coat of Polyurethane.
- Do not walk on for a minimum of 24 hours and allow 14 days before parking cars on it.
-
*NOTE: Polyurethane has a 7-10 day full cure through rate. Please exercise caution when sitting furniture on, sliding boxes etc and walking on in this time frame. DO NOT DRIVE ON FOR A MINIMUM OF 14 DAYS.
Specifications
Product Name: Epoxy Flake Flooring Kit
Pack Sizes:
- 1 x 5kg Decorative Polymer Epoxy Flake Floor Chips
- 1 x 3.6L Coloured Low Sheen Water Based Epoxy
- 1 x 4L High Gloss Polyurethane
FAQ's
- Q – Can the Epoxy Flake Kits be used on timber?
- A – Yes, the Epoxy itself will bond with the timber or particle board, however no Aqua Prime is required.
- Q – Can the Epoxy Flake Kits be used on fibreglass?
- A – Yes, however the fibreglass needs to be extremely clean, free of any contamination and abrasive enough for the epoxy to adhere to it. Preparation is to sand roughly using 180# sandpaper and thoroughly clean (no primer is required).
- Q – How long after I complete the installation can I park cars on the epoxy floor?
- A – Allow a minimum of 10 days, preferably 14 days before allowing rubber tyres to be on the coating.
- Q – How clean does the concrete need to be before I apply the flake flooring kit?
- A – The concrete needs to spotlessly clean and also have some porosity to it, please read the Preparation instructions under the “Information Guides” tab above
- Q – Can I use the flake flooring kit outside?
- A – Right Choice coatings does not recommend this (some companies will). The epoxy is not uv stable and it is not designed to be used outside. Epoxy is a “hard set” product and does not allow for expansion and contraction of the concrete. Moisture is also a concern in an outdoor environment. Having said that, if you are confident that moisture is not a concern and that there is no movement in the concrete then it can be achieved.
20 reviews for Epoxy Flake Flooring Kit
There are no reviews yet.
Jake –
Goes on easy, and the data provided is accurate.
Here in Townsville, to get a 15 – 27°C window of opportunity, I had to paint the garage at 5.30am, as soon as there was enough light.
The products were excellent, including the degreaser and aqua prime.
Bought 10kg of flakes, and have about 3kg left over from 54m2.
One 10L kit was plently, ended up with about .5L left over after a pretty thick coat. Looks excellent and can’t wait to see it with the top coat.
Melissa Mckee –
Hi guys,
Just sending through some pics for you. We did our new shed build. It’s 14m x 6m and is for our new dog shed. We brought all our products from you and laid ourselves. We are so happy with the end result, loving it bigtime!!!
I’ve just ordered the products to do our garage too.
Janet Tyrrell –
Brilliant product. Very easy to use. Great finish. Fast delivery. We are very pleased with the result and have been recommending this company to others.
John Cottrell –
This product was great to work with easy to apply and the calculated qty was spot on.
they give you ample flakes in the kit which is a huge bonus to make your project even.
I used this on my concrete stairs and it has really given them a total face lift.
thanks guys for making a product that the home handy man can make look like a professional job
David Chalabi –
These guys were nothing short of amazing! The service, the contact, the product! They’re pretty much the works when it comes to your specific needs.
We purchased 3 of the epoxy flooring garage kits. Easy to apply with instructions written in plane English for us to understand. Throughout the process I had instructions provided by the service team and they helped apply the best grade floor I could apply for my first time.
I truly value and appreciate the service, product and support provided and thank the team at right choice!
I strongly approve and support right choice as a business and would recommend to family and friends.
Thank you Right Choice for helping me make the right choice when it came to my garage!
Elman Crichton –
Great product. Good service. We are definitely recommending it to clients.
George –
Wow, what a product. Service was exceptional and the company was happy to help with any advice I needed. Highly recommend
Johnathan Marsh –
Used the flake flooring kit for our double Garage. and it came up an absolute treat. Highly recommend this product!
Brendan Pike –
Great product (2nd time around after buying the Bunnings one, get what you pay for). The end result looks like a professional did it. Got some great advice from the guys at Right Choice, thank you for spending the time to help. AAA+
Judith Valentine –
We’ve just finished our garage floor and it looks amazing. The tech guy at Right Choice answered all our questions and helped us a lot. I rang several times with more queries and he was very reassuring. It was great to know that tech support was only a phone call away. Highly recommend this product.
Peter –
After extensive research for the ideal product l believe l have found the perfect product for textured floor finish.
With a little advise from the team it was a very easy process applying the product.
My garage floor looks amazing and have envious neighbours and friends admire the finish.
I would highly recomend the product to anyone, and if anyone in Melbourne is thinking of applying it and would like to see the finished product i’m happy to do so.
My only criticism is with the delivery company just leaving the product at the from door with no advise of the delivery being made.
MARLOWE ANGELES –
After showing 2 mates what my area looks like with the kit from supercheap/bunnings vs the area from right choice coatings hands down a lot better. Got great advice and the right product for my floor that would see high traffic, hot tyres, jack stands. You get 5kg of flake with their kit vs 500gram of flake from supercheap. You can actually get professional advice from right choice coatings.